How to start your cross stitch
You got a pattern from our site. This is your first cross-stitch project (or first few, no judgment here). How do you start?
Get the hoop and aida cloth
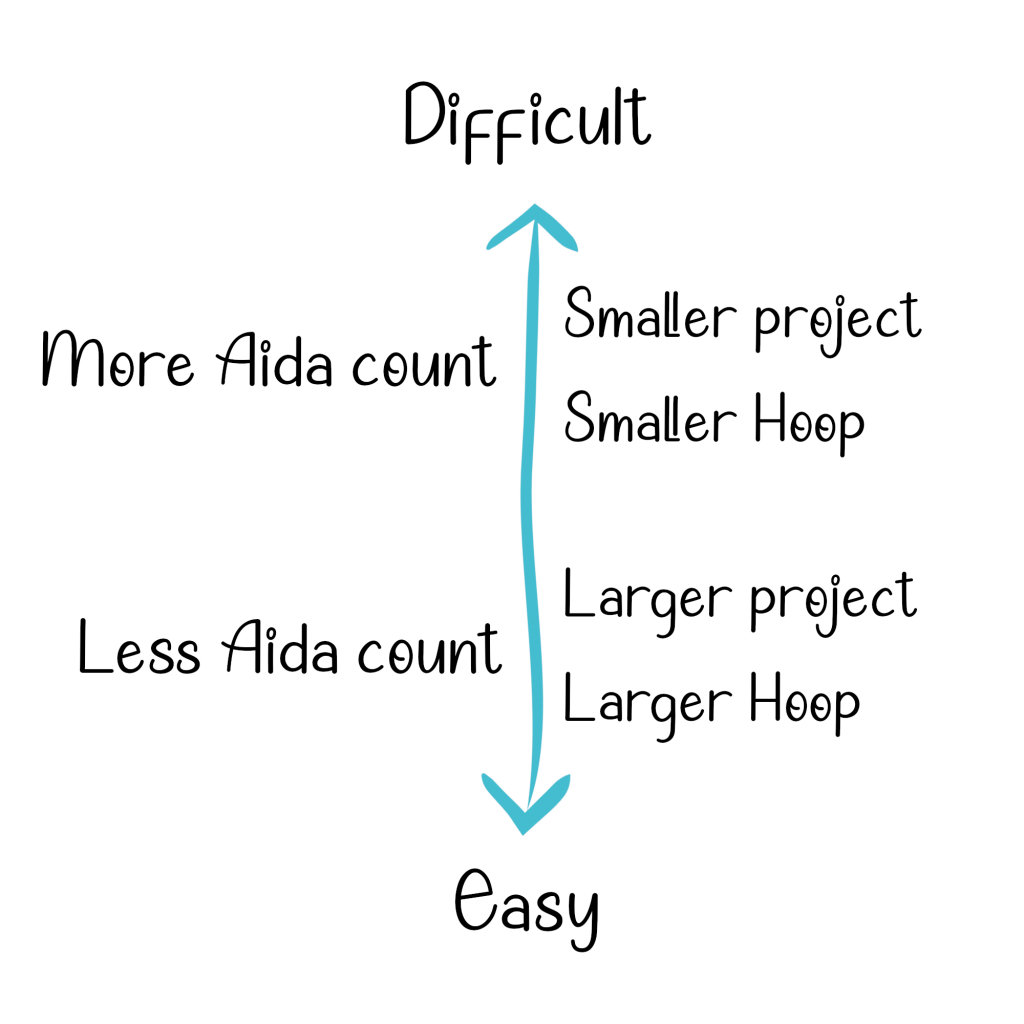
The hoop size is tied closely to the your aida canvas and the finished project size.
If you purchased a cross stitch kit, this whole section has been figured out for you automatically, you don’t need to worry about this at all. Skip ahead to “Get the Floss” section below.
Please look at the downloadable “Pattern Info” sheet that’s included in your order to see what project size you’d like. If you want a larger finished product, then pick smaller aida cloth count. The larger the aida count, the more difficult it is to see because there are more stitches condensed in a small canvas area. For beginners, we recommend the 11 count, 14 count, or the 18 count Aida cloth.
Picking a hoop that is less than the suggested size in the “Pattern Info” sheet will cause you to not be able to fit the pattern entirely in your hoop. If you pick a hoop that is a lot bigger than the suggested size, then the stitch will look small compared to the rest of the hoop.
A visual example of recommended hoop size is also available on the product listing. You can go to the product listing by visiting your order history when you’re signed in, or looking at the link on the “Pattern Info” sheet.
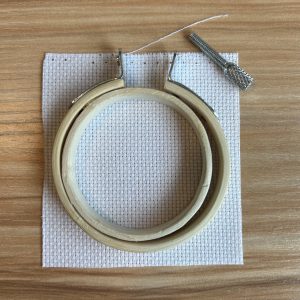
Once you have the clothe and hoop, cut a square of cloth that is just a little bit larger than the hoop (see below). The extra width is needed so that the cloth can be wrapped around the inner hoop. On an even surface, put the cloth on top of the inner hoop, and then push down the outer hoop on top of the cloth. Hold the outer hoop tightly with one hand, and use your other hand to tighten the outer hoop with the screw. Your canvas is now ready!
Get the correct Needle
The correct needle size depends on the aida count. This information is also available in the “Pattern Info” sheet. Once you decide on the Aida cloth count, you’ll see the corresponding needle size there.
Get the Floss
Our patterns list the DMC floss code of each color so you can find the exact hue, and it will list how much skein is needed. If you purchase a cross stitch kit, you already have all the floss you need. If you don’t have your floss already, please head over to your local craft shop to get them. DMC brand floss is of quality and can be found easily anywhere.
Once you have your floss, for each color you’re working on, cut a piece that’s no more than 12″ or about 30cm at a time. You want to keep it not too short so that you don’t have to refill the needle often, but not too long that you get it tangled often.
The DMC floss comes in 6 strands. You’ll stitch with 2 strands at a time. So how do you separate them after you have a 12″ chunk? This short video is the most helpful out there in successfully getting 2 strands without tangling the rest of the floss.
Center Your Work
If you look at your printed pattern, you’ll see on the top of the pattern about halfway the width of the pattern there’s a solid triangle pointing down. There’s also another solid triangle pointing right on the left of the pattern about halfway down the pattern. Following the intersection of the row and column the 2 triangles point to, you’ll see a grid in the pattern that has an X symbol. This is the center of your project.
Now get your hoop and canvas and locate the middle of the canvas. This middle of the canvas, with holes on its 4 corners, corresponds to where the center of the project you found earlier in the pattern. All other grids are related to this center of project. You can pick starting your project with this color, if you’d like, and pick a place to start with this color. I’d suggest picking a corner of this color, and start your stitch there.
Needle Threader
Why a Needle Threader? Needles have narrow holes for the thread because they need to be able to go through the fabric smoothly without leaving behind large holes in the fabric. Threading 2 strands of floss through the hole can be difficult. The needle threader helps you do this. If you get a cross stitch kit from our site, your kit should include a needle threader.
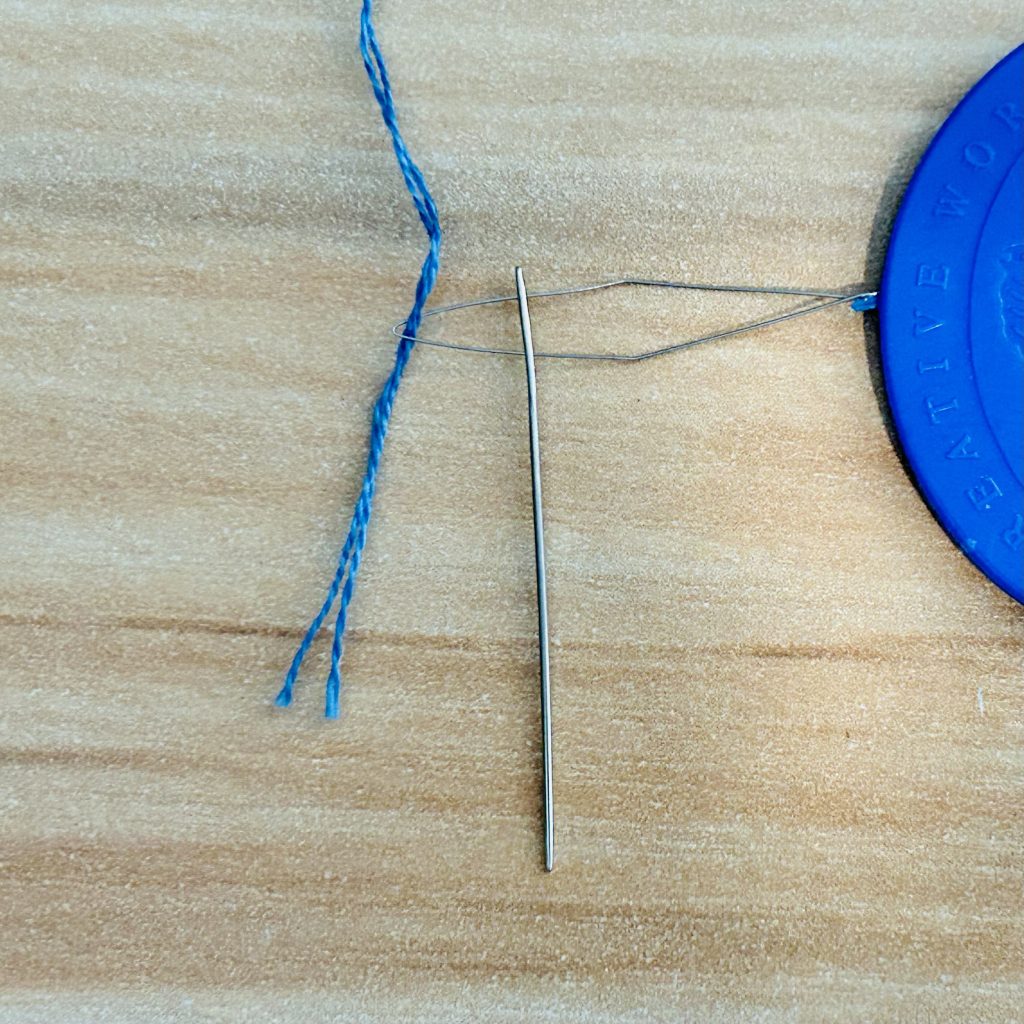
How to use a needle threader
- Put the needle threader wire through the needle hole.
- To achieve what you see in this picture, put 2 strands of floss at the tip of the needle threader wire.
- Pull the needle threader wire through the needle hole. In the picture here, you pull the needle threader to the right.
- The needle has been threaded!
The Beginning and the End
Now that your needle has been threaded, you figured out your the center of your work and decided which square in the canvas will be your first stitch, we’re ready to do the first stitch!
Starting the first Stitch
I find this video the most useful in starting my stitch. It’s very easy and doesn’t require making any knots, wasting very little floss. The method starts at video minute 3:36 until 7:00.
Casting off
To finish off stitching with a single color, I like this method the most described in this video below minute 1:34 until 2:58.
Leftover Floss?
If you have leftover floss, head over to hoopsiejava.com/matcher to other patterns that use the leftover floss. You can search by the DMC floss code or the name of the pattern bought from varidita.etsy.com or hoopsiejava.com.